Friday, July 17, 2015

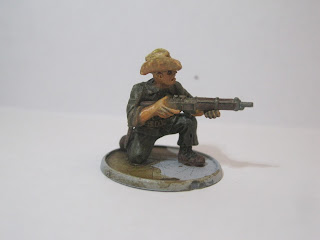
Building and painting a Legionnaire for Indochina

When I first bought some of Redstar's French paratroopers for Dien Bien Phu I was completely taken by the awesome quality of the sculpts. From there i rapidly expanded my collection of troops for the conflict. Redstar put out some Viet Minh which I quickly acquired and then supplemented with figures from The Assault Group. Expanding the Viet Minh was easy because there's so many ranges with Vietcong armed with rifles and submachine guns but the French are another matter. Looking at my reference books I found that the French used everything and anything they could get their hands on which led to a huge mix of uniforms and equipment. The easiest thing to do to make some French Legionnaires or generic infantry would just be to buy somebody's line of  WWII figures and paint them up accordingly but that route is for sissies. I wanted to make some troops that were armed appropriately and had a mixture of equipment and different headgear than regular helmets.

By 1952-53 most French troops had begun receiving the M1947/52 uniform. Nobody makes figures with those specific uniforms but from eye to tabletop distance when painted as such the herringbone twill uniforms fit the bill nicely. Warlord has a box set of plastic USMC that i used as my starting point and i ordered some of the heads in slouch hats from Red Star as well as Mas-36 rifles from The assault group.


First step is always removal of mold lines and during this step i also like to make the neck hole go a little deeper. Warlord plastic heads have a rounded fitting on the head while the Red Star heads have more of a peg so by drilling a slight hole the head fits in much easier.


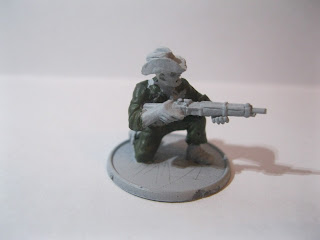
Assembly is fairly easy although if the rifle doesn't sit in the arm just right there tends to be a gap but that's easy enough to fix. In the photo below I just filled it in with some glue then smoothed it with a file when it was dry. For this particular figure I didn't go crazy on the amount or type of webbing like I have on others. This guy just got some US ammo pouches and a canteen straight from the box. 


Another thing I do with these figure is score the base so that there's more for the glue to cling too. Then it's just a matter of sticking him on the base and priming grey.


Below are all the paints I used as well as GW tallarn sand.


First step is to paint the uniform in Gw castellan green


Tallarn sand for webbing


Flat Brown for wood and leather


Pale flesh, gunmetal grey, and bone white for the hat


Hit the whole thing with a watered down sepia wash


drybrush the everything but the skin with khaki and then drybrush the flesh with ratskin flesh


then just base and flock accordingly


Monday, July 6, 2015

Start of a Japanese platoon

I've more or less finished up 30 of Warlord's veteran Japanese infantry to form the core of my Japanese platoon for Bolt Action. I considered buying the troops to form a complete platoon in one go, until I looked up the organisation of a Japanese platoon and holy cow those things are 57 men strong. I got increasingly frustrated trying to paint these guys up because some of the detail ran together and at times it was difficult to distinguish various details from each other. For now I'll hold at these three base squads and then get a few support weapons and see how it's going from there and if i decide to increase this force maybe I will look into the plastics instead.